My Pfaff Quilting Expression 4.2 is in the shop for a tune-up, and I am back to sewing on my old White machine. At the time I purchased it (probably about 20 or more years ago) it had a lot of features I thought were pretty innovative... such as needle up/down setting, speed control, start/stop button to use in place of the foot control, and automatic needle threader. Now, those features are standard on many machines. My Pfaff has no presser foot lever, and that is a huge time saver when I'm piecing a quilt. It is all automatic, but has a knee lift for the presser foot, or a button to raise or lower it if I need to. It has a scissor function, as well. It's taking me some time to get used to raising and lowering the presser foot manually, but after I cleaned it all up and took half a mountain of lint out of the bobbin case, it sews like a charm. This machine will likely go to one of my grandchildren, when they are ready to start sewing.
I had over a month long bout with bronchitis, so did not feel up to doing much sewing.
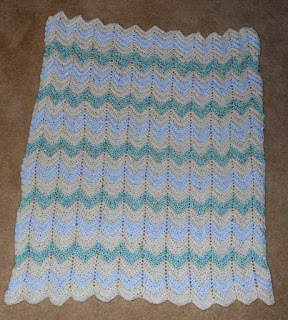 I did manage to crochet my first ripple afghan... a baby boy afghan for my second great-grandchild, due in a couple of weeks (shown at left). I also made him two baby quilts, and finished two baby girl quilts for my first great-grandchild, born in March, in time for her birth. I'm working on a couple of quilts that will probably be queen sized, if I don't get tired of them before they get that large! One of them was started several months ago, and I pulled it out again when I got tired of sewing on the current flimsy. I had 6 blocks completed on this quilt, and several more cut out and ready to sew. I sewed one more, taking photos as I did, for this blog.

I saw a version of this quilt demonstrated on Fons and Porter's TV show. As always, I try to figure out a way I can rotary cut and simplify the block. I have a June Tailor Shape Cut ruler that is as necessary to me as my right hand. I can cut many strips at a time, usually several thicknesses, too, so the cutting goes fairly fast. It takes me longer to dig out the fabrics from my stash, and then fold the yardage back up for storage again. This is a block with many pieces... 41, if I count the half square triangles made with the 7" square as 8. The instructions on making those speedy HST, 8 at a time, is on a prior blog: http://diamonnaturals.blogspot.com/2014/09/gluten-free-popovers-and-speedy-half.html. I also have links on the right, to access prior blogs.

Here is a photo of the 7 completed blocks on my design wall. I think I will join them with sashing and a print square to match the center of the star between blocks on the sashing. My blocks are mainly made up of florals, so I am calling it Star Flower.
I also made a sample block for a child's quilt, made of a fat quarter bundle of puppy and kitten prints, with a tiny star on gold for the background on this quilt. See photo at right.

Star Flower Block:
For each
block, 15” finished size:
1 each 7”
square of background and Print A, to be sewn diagonally both ways and cut to
make 8 HST’s. (Shown as light blue on block at right)
4 – 3-1/2”
Print A squares, to be cut diagonally to make 8 HST’s
4 – 3”
background squares (Shown as gold star)
6 - 3-1/2” Print B squares, to be cut diagonally to make 12 HST’s (Shown as orange on photo at right)
6 - 3-1/2” Print B squares, to be cut diagonally to make 12 HST’s (Shown as orange on photo at right)
4 – 4”
squares Print C (Shown as light print)
4 – 3”
squares Print C
1 – 4”
square print D, center square
For speedier cutting, I cut 7" strips of prints and background, and then cut those strips into 7" segments. Of the same prints, I cut 3-1/2" strips and cut those into 3-1/2" segments, then cut those squares diagonally to make half square triangles. These will comprise the "frame" with the 8 HST's.
Background: 3" strips, cut into 3" segments.
Print B: Cut 3-1/2" strips, cut into 3-1/2" segments; cut squares diagonally to make HST's.
Print C: Cut 4" strips, cut those into 4" segments, Cut 3" strips, cut those into 3' segments.
Print D: Center square; cut 4" strips, cut into 4" segments.
I put each size square into a stack and then chose coordinating prints to make my blocks. I used a Wonder clip to hold the pieces together. Next, I put a 7" square of print and one of background together, right sides facing, and drew the sewing lines, as shown in the instructions for making 8 HST's at a time. Because there are so many pieces, it does take some time to sew each block. I always press as I sew, and have my ironing board at a right angle to my sewing table, so I can simply swivel to press.
This block can easily be broken down into units to be joined
like a 9-patch. Each of my 9 patches
trimmed down to 5-1/2” before finishing, or 5” when finished. Sometimes I trim the blocks, but not always. Trimming takes additional time, so it depends on how much time I want to spend on the block, but it does look neater. See photo below to see the layout of the 9 segments of the block.

Sew 4 print
B HST’s to center square print D. Center
square-in-a-square is formed. See photo below.


Sew 2 print
A HST’s to opposite side of 4” print C squares (8 HST’s)
4
square-in-a-square units formed with 2 colors of HST’s.
See photo at right.

Corners: Join
2 HST of Print A, 1 Print C squares and 1 background square, as shown. Complete all 4 corner units.
There are
now 9 completed units. Join them in horizontal or vertical rows, pinning at
intersections. I found it helpful to sew with the side facing me that had the HST's attached to the center square, so I could more easily match the points.
Here is the completed block:

I love this block in floral fabrics... my fabrics are all in the blue, green, and pink families for this quilt. It has a romantic, feminine vibe that feels traditional but modern. The background is a very pale celery tone-on-tone, that reads white from a distance.
It's been a long time since I took the time to photograph my blocks in progress and post them to a blog, but I will try to do better. I have some baby quilts I need to write tutorials on, among others. I have some lovely fabrics with an Asian flavor that I've made a large snuggle quilt with... it's sandwiched and ready to quilt. It was a quick and easy quilt to make, as I wanted to find a pattern that could showcase the beautiful luxurious fabrics. I have so many ideas for quilts... and so much fabric to make them with! And another Christmas is just around the corner.
It seems overnight the days have gotten so much shorter already. Some places have already gotten shots of snow and cold, but here in southern Ohio, it is still hot and humid. I hope whatever the weather where you are, that you are safe in this season of terrible storms.